

If you’re managing storage with Dell’s OneFS, you know how crucial it is to maximize performance and reliability. The Dell Multipath NFS driver for OneFS 9.9 introduces new features like remoteports, modified nconnect, and RDMA support, making it a powerful tool to enhance your NFS configurations. This guide will walk you through the installation process (in our example Ubuntu 22.04), even if you’re relatively new to Linux, by the end of this tutorial, you should have a fully functional multipath NFS setup.
The multipath driver allows Linux clients to mount a PowerScale cluster’s NFS exports over NFS v3, NFS v4.1, or NFS v4.2 over RDMA.
What Does This Driver Offer?
Well, a lot ! before diving into the installation, let’s explore what options this driver brings to the table: One or more of these options can be used in conjunction, depend on your topology.
Check out the guide here for multiple configuration examples
1. Remoteports: The remoteports option allows your NFS client to target multiple servers or NICs for multiplexed I/O. This spreads the load across multiple file handles, avoiding performance bottlenecks.
2. Modified Nconnect: Unlike its OS Linux counterpart, the nconnect option in this driver doesn’t collapse connections but rather works in tandem with remoteports to distribute the load across multiple interfaces.
This simple example uses NFSv4.1 on the client with 8 socket connections to the PowerScale cluster
mount -t nfs -o vers=4.1,nconnect=8 10.181.99.228:/ifs/test-multipath /mnt/nfs_share_multipath3. RDMA Support with Nconnect and Remoteports: The driver supports RDMA when combined with both nconnect and remoteports, providing high-performance networking capabilities that aren’t possible with standard OS Linux.
4. Localports: This option allows you to specify local interfaces or IP ranges to distribute traffic efficiently to remote points.
As covered in the guide – In this (more typical example) example, NFSv3 with RDMA is used to spread traffic across all the front-end interfaces (remoteports) on the PowerScale cluster:
This client NFS mount configuration would open 5 socket connections to two of the ‘remoteports’ (cluster node) IP address specified and 4 socket connections to the other two.
mount -o proto=rdma,port=20049,vers=3,nconnect=18,remoteports=10.231.180.95- 10.231.180.98 10.231.180.98:/ifs/data /mnt/test
As you can see, this driver can be incredibly powerful given its ability to multipath comprehensively. Clearly, there are many combinations of local and remote ports and socket connections that can be configured.
Downloading the Client Side Driver
The client side driver is now available to download (at no cost) from the Dell support site here

Minimum OneFS version for transport protocol support
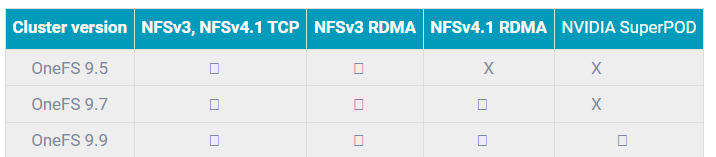
Note: For NVIDIA SuperPOD support, the multipath client driver requires a cluster to be running OneFS 9.9 or a later release.
Supported Linux OS’s
As of time of writing the below table represents current supported versions – however be sure to check regularly on the support site

Building & Installing the Driver
Why Build the Driver?
Building the driver is essential due to potential kernel mismatches that could cause installation failures. For instance, even minor kernel version differences can prevent the driver from installing correctly.
Step-by-Step Installation
Step 1: Prepare Your Environment
Start by installing the necessary dependencies. If you’re on a Debian-based system (like Ubuntu), use the following command:
apt-get install debhelper nfs-kernel-server
Step 2: Download and Extract the Driver
Download the .zip file from the Dell support site and transfer it to your Linux host using a method like SCP. Extract the contents:
unzip dell-nfs-client-driver-ext-BR_MAIN.zip
Step 3: Compile the Driver
Navigate to the directory where you extracted the files and run the build script:
./build.sh binStep 4: Build the Debian Package
Once the build is complete, create the Debian package:
./build-deb.sh
This will generate a .deb package in the dist/ directory. You should see an output like this:
dellnfs-modules_4.0.22-dell.kver.5.15.0-89-generic_amd64.debStep 5: Install the Package
To install the package, use the following command:
sudo apt install ./dellnfs-modules_4.0.24-Dell-Technologies.kver.5.15.0-119-generic_amd64.deb
Step 6: Regenerate Kernel Image
After installation, regenerate the running kernel image:
update-initramfs -u -k `uname -r`
Step 7: Verify the Installation
Ensure that the package is installed correctly:
dpkg -l | grep dellnfs-modules
You can also verify specific modules:
dpkg -S /lib/modules/`uname -r`/updates/bundle/net/sunrpc/xprtrdma/rpcrdma.ko
Step 8: Reboot the Client
Reboot your client to apply the changes.
Step 9: Verify the Module Status
After rebooting, check the status of the installed module:
dellnfs-ctl status
You should see output similar to:
version: 4.0.22-dell
kernel modules: sunrpc rpcrdma compat_nfs_ssc lockd nfs_acl nfs nfsv3
services: rpcbind.socket rpcbind rpc-gssd rpc_pipefs: /run/rpc_pipefs
Testing Your Setup
Once the driver is installed, you can begin testing it. For example, on Ubuntu 20.04, you can mount an NFSv4.1 share with the following command:
mount -t nfs -o vers=4.1,nconnect=8,remoteports=10.231.180.95-10.231.180.98 10.231.180.95:/ifs /mnt/test
The verify the output from your powerscale using the isi_for_array 'isi_nfs4mgmt' command – It should show multiple connections distributed across your servers.
Lets see it it action. Check out my video for a quick overview, installation , PowerScale config and Ubuntu mounting walkthrough (with testing) enjoy!
Conclusion
The Dell NFS Client Driver is a valuable tool for optimizing NFS performance in demanding environments. Its key features, such as Remoteports, modified nconnect, and RDMA support, enable it to deliver improved throughput, scalability, and reduced latency.

Leave a comment